Sharing DNA results is the easiest way to assist clients, family and friends with their DNA research.
Sharing instructions differ for each DNA testing company, so follow the instructions below for the DNA tests you have done. Some companies provide easy and secure sharing options, eliminating the need to share your login credentials. You maintain control and you can downgrade or revoke access at any time.
The instructions below are for web browsers – for example via the DNA testing company’s website on a computer or mobile device. The menus on their mobile apps may be different.
How to share your DNA results with me:
Sign in to your Ancestry account in a web browser (ie. Ancestry’s website).
Click on your profile image in the top right corner, then click on Account Settings.
On the Account Settings page, click on DNA in the left menu.
Select your name under DNA tests.
Scroll down to the DNA test sharing section, and click on the arrow to the right of DNA test sharing:
Click on the blue Invite button.
Type or copy and paste my email address or my Ancestry username (GeneticGenealogist) into the first box. Select ‘Collaborator‘ from the Role box and then click Invite.
Done! Once you have clicked Invite, Ancestry will email me an invitation to view your results, and once I accept it, they will email you to let you know.
Note: You control your sharing, so you can change or revoke sharing access at any time.
(Sharing Tip: If I only need to view your DNA results, you can just select Viewer access. If I am helping you with an unknown parentage case, a genealogy mystery, an unidentified match, unravelling complex relatiionships, or coaching you how to work with and organise your DNA results, then I will need Collaborator access in order to group your matches, review your DNA account settings, link your DNA to your family tree, add notes to matches, link matches to your tree, view your ThruLines, and show you how to do all these things. Click on 🛈 Role to review role functions).
Sign in to your MyHeritage account.
Hover over the DNA tab on the top menu, and click on Manage DNA kits.
This will list the DNA kits you manage. Click on the three dots icon to the right of the kit you want to share, and select Share DNA results with a Collaborator.
When the popup opens, enter my email address into the box. It must be the email I use for my MyHeritage account, which is shown below (please don’t share it with anyone else):
Then click the Share button and I will receive an invitation email from MyHeritage.
You can revoke sharing at any time.
Sign in to your Family Tree DNA account.
Once you have signed in, click here to open my private FTDNA project page or click on the project header image below:
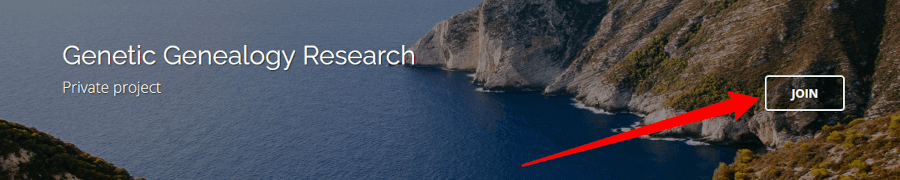
Click on the JOIN button in the header and follow the instructions to confirm.
Joining my project will provide me with a limited view of your FamilyTreeDNA results without you needing to share your login details.
Note: You control your sharing, so you can downgrade or revoke admin access or leave the project at any time.
(Tip: The default admin access level, ie. ‘Limited’, may be all I need, unless you’d like me to help you with your myFamilyTree and the Family Matching feature (eg. to link Family Finder DNA matches to your tree to populate your Paternal/Maternal/Both tabs), or if you’d like me to review any FTDNA Project results, such as Y-DNA surname projects, in which case I would need Advanced admin access to view, use, or show you how to use those features).
Living DNA offers a sharing feature for your own kit, but not for kits in your account that you manage for others.
Sign in to your Living DNA account.
Click on the arrow next to your profile image in the top right corner, and select Profiles from the drop-down menu.
The kits you manage will be listed. Click on the arrow to the right of your kit name.
On your Profile page, scroll down to the section labelled Permissions.
Click on the arrow to the right of the Manager option. Read the information about Manager access, then enter my email address (as below) into the Email field and click Save.
Note that you can only share with one person at a time, so if you have already shared with someone else, you can replace their email with mine temporarily and switch it back later or revoke all sharing if preferred.
I will then receive an email notification from Living DNA.
23andMe does not currently offer the ability to share DNA results with another person or collaborator.
Screen sharing
We can view your 23andMe DNA results together during our online consultation. While we are screen sharing, I will watch and explain as I guide you through navigating your own results.
The other option is to share login credentials, in which case you may opt to set a temporary password.
If you have previously uploaded to GEDmatch, you can simply share your kit number with me.
Your kit number can be found on the Dashboard (home) page of your GEDmatch account. If you are not familiar with GEDmatch and would like to learn more, my blog post Tips for Using GEDmatch explains what it is, how to upload your DNA data, and how to use the most popular features and tools. We can review your results and the most popular tools during your consultation.
Ensure that your GEDmatch kit is set to either Public or Research, as if it is set to Private, I won’t be able to see it. Instructions to check your GEDmatch kit.
If you already have a family tree – or even just a part of a family tree – that is relevant to your DNA research goal or genetic genealogy consultation topic, please let me know what you have.
If you have an Ancestry family tree online, follow the instructions on the next tab to share that with me.
If you have a family tree elsewhere online, such as at MyHeritage, WikiTree, FamilySearch, Geni, FamilyTreeDNA, or GEDmatch, let me know what and where, and share the URL if applicable.
If you have a family tree offline (eg. on your computer, a PDF or Word file, or even just a chart or notes on paper), let me know and I’ll suggest the best way to share them.
If you don’t have a family tree at all (perhaps because you don’t yet know your family), don’t worry… we will address that and start a free tree for you if required.
Sign in to your Ancestry account in a web browser (ie. Ancestry’s website).
Click on the Trees tab at the top of the page.
Select your tree from the list (if you have more than one tree) to view the tree.
In the tree view, you will see an icon menu strip down the left side of the page. Hover on the three dots icon and when the menu pops up, click on Tree settings,
Near the top of the Tree settings page, just under the heading, are three tabs… Tree Info, Privacy Settings, and Invitations. Click on Invitations.
Click on the grey + Invite people button at the top of the Manage invitees list.
The invite popup box has three tabs. Click on the Email tab, enter my email, select Editor from the Role drop-down, and switch the toggle on so I can See living people.
Click the blue Send Invites button and Ancestry will email me an invitation to view your tree.
If you don’t already have a private & unsearchable family tree on Ancestry (where unlimited online trees are free), specifically to assist with your DNA research to identify biological family, below are instructions to create one and share it with me so I can show you how to use it.
Sign-in to your Ancestry account.
Click on the Trees tab at the top of the page.
From the trees menu, click on Create & Manage Trees.
Scroll down and click on Create a New Tree at the bottom of your list of trees (if you have any).
You will be prompted to add the first person (the home person) to your tree.
This is normally you, so click on + Add home person. Enter your name, select your gender/sex, add your birth date (if you are searching for a parent, otherwise birth year will do), and birth place, and then click Continue.
You will need to enter at least one parent’s name to finish creating the tree. If you don’t know either parent’s name you can just type in Unknown for the name, as we can easily edit it later. Click on Add mother, or Add father. Enter the details of the parents, or type in Unknown, then click Save.
Now you need to name your tree. Something descriptive is usually best, such as Your Name Private & Unsearchable DNA Tree, or Your Name DNA Research Tree, or Your Name Speculative DNA Tree. Uncheck the box allowing others to view your tree. Click on Save tree.
Go back to the Tree Settings from the menu on the left, and this time select the Privacy Settings tab. Scroll down and check the Private Tree option, and below that check the option to Also prevent your tree from being found in the search index. This will ensure your tree is Private & Unsearchable, so that no-one else sees your tree or receives hints or information that you enter into your tree.
You have now successfully created your own Private & Unsearchable family tree! Remember that you can always find it very easily by clicking on the Trees tab on Ancestry’s top menu.
Next, back on the Tree Settings page, click on the Invitations tab and follow the instructions (in the previous tab) to share your new tree with me.
If you have done an autosomal DNA test at any of the major genealogy testing companies, your raw DNA data file will be accessible to you from your online account. You can download a copy of your DNA data file and save it to your computer (it is only 6MB in size when zipped, or 18MB if opened/unzipped).
You can keep a copy on your own computer or external storage device as a backup, and you can upload a copy of the file to other DNA testing companies that accept transfers inwards, you can upload it to GEDmatch, and use it for a range of other third party utilities.
You only need to download DNA data from one company, not all. If you have tested at AncestryDNA, download that one.
Sign in to your Ancestry account.
Click on your profile image in the top right corner, then click on Account Settings.
On the Account Settings page, click on DNA in the left menu.
Select your name under DNA tests.
Scroll down to the section labelled Download or delete, and click on Download DNA data (be careful not to accidentally click on ‘Delete DNA test’!)
On the next screen, check the box to confirm that you want to download a copy of your DNA data, then click Continue.
Follow the instructions to verify your account, via a code to your email or by entering your current password.
Ancestry will then email you a link to click to download your DNA data file. Follow the instructions and save the file to your computer or device. Save the file, don’t open it (so it stays zipped).
TIPS
Sign in to your FamilyTreeDNA account.
Hover on Results & Tools in the top menu, then on Autosomal DNA, then click on Download Raw Data.
Or on your Dashboard (home page) under the Family Ancestry – Autosomal DNA Results & Tools section, click on + See More and then select Data Download.
Click on Build 37 Concatenated Raw Data (GZIP, CSV) and save the file (leave it zipped, ie. save it, don’t open it).
TIP! If you manage DNA data for multiple family members, it is best to create a separate folder for each person so their DNA data files don’t get mixed up.
Sign-in to your MyHeritage account.
Hover over the DNA menu tab near the top of the page and click on Manage DNA kits.
Click on the three dots icon to the right of your kit, then click on Download kit.
Read the popup then scroll down and click CONTINUE.
Tick the checkbox to acknowledge you have read the download notice, and then click CLOSE.
Check your email for a message from MyHeritage.
Click the email link to download your data file and your browser will open again.
Enter your Password and click DOWNLOAD, select a location and click SAVE (leave it zipped, ie. save it, don’t open it).
TIP! If you manage DNA data for multiple family members, it is best to create a separate folder for each person so their DNA data files don’t get mixed up.
Sign-in to your 23andMe account.
Click on the drop-down arrow next to your profile picture and name near the top right of the page, and then click on Browse Raw Data.
Click on the Download tab.
Scroll down, check the box to confirm your request to download your raw data file, and click Submit request.
23andMe will email you when the data file is ready to download.
Click the link in the email to download the data file, and save it to your computer.
TIP! If you manage DNA data for multiple family members, it is best to create a separate folder for each person so their DNA data files don’t get mixed up.
Sign-in to your Living DNA account.
Click on Profiles near the top right of the page.
The Profile page lists all the DNA kits in your account. If you only have yours, only that one will be listed. Either click on the little blue Download icon to the right of the profile you want to download, or click the little blue arrow to go to the profile details page.
If you clicked through to the Profile detail page, click the Download link under Actions.
The next page will display Privacy information for you to read and agree to. To continue, scroll down and tick the checkbox to provide your consent, and one or more dark blue buttons will then become active.
Click on the button labelled Download autosomal (family ancestry) raw marker data and save the file to your computer.
TIP! If you manage DNA data for multiple family members, it is best to create a separate folder on your computer for each person so their DNA data files don’t get mixed up.
Once you have downloaded your raw DNA data file and saved it to your device or cloud storage, then you can upload it for free to other DNA databases to get more matches. Note that you are not removing or deleting anything from your existing testing company, you are simply downloading a copy of your raw DNA data file from your testing company account and uploading it to the other companies instead of testing directly with them.
AncestryDNA and 23andMe are the only major genetic genealogy testing companies that don’t accept data transfers inwards, so if you want to get your DNA into their databases, you’ll need to test directly with them. The databases below accept free DNA data uploads, so you can take advantage of that to get more matches quickly without testing directly. The majority of DNA testers only use one company, so you’ll most likely find some new DNA matches that haven’t tested where you have.
The free uploads include your list of DNA matches and the ability to contact them, however not all features such as ethnicity estimates and chromosome browser and other DNA tools will be included. Some companies charge an optional fee per kit to unlock those extra features.